
Radar system - Ft. S400 OP SINDOOR
- thestudentprojects
- May 17, 2025
- 6 min read

Updated: Aug 4, 2025

🛠️ What is it?
The Radar Simulation System is a beginner-friendly electronics project that simulates a basic radar setup. It uses an ultrasonic sensor (HC-SR04) mounted on a servo motor, controlled by an Arduino, to scan for nearby objects. This data is then sent to a computer and visualized in real-time using Processing IDE as a sweeping radar interface — just like a real air defense system.
🌟 A Tribute to Tech in Defense
Ft. S-400 – Inspired by modern radar and defense systems, this project is a small tribute to Operation Sindoor and the incredible technology that keeps our skies safe.
💡 Why Build This?
Perfect for beginners, this project helps you:
Understand how radar-style detection works
Learn how to use Arduino with servo and ultrasonic sensors
Visualize real-time sensor data with a radar-style sweep
Get hands-on with Processing for graphical interfaces
🔧 Step 1: Gather the Components
Component | Quantity |
Arduino Uno or Nano | 1 |
HC-SR04 Ultrasonic Sensor | 1 |
SG90 Servo Motor | 1 |
Jumper Wires | 6-8 |
Breadboard (Optional) | 1 |
USB Cable (for Arduino) | 1 |
Computer with Arduino IDE and Processing IDE installed | ✔️ |
🧩 Step 2: Connect the Components
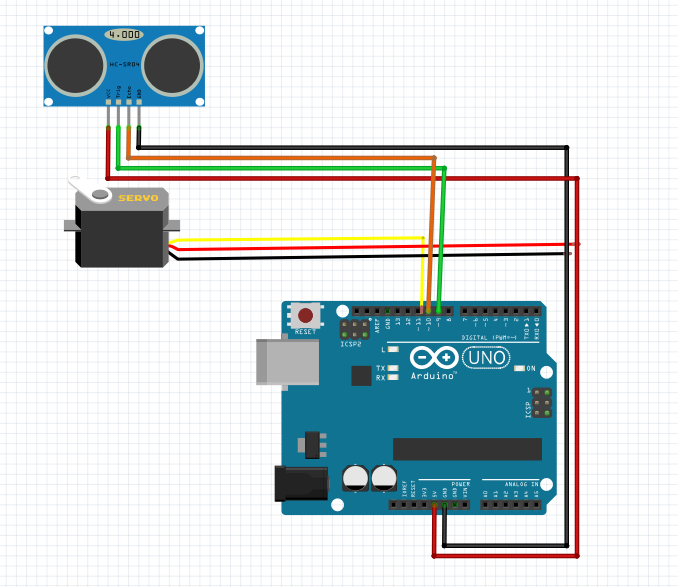
🔌 Connections:
Servo Motor:
Signal (Yellow) → D11 on Arduino
VCC (Red) → 5V on Arduino
GND (Brown) → GND on Arduino
Ultrasonic Sensor:
VCC → 5V
GND → GND
TRIG → D9
ECHO → D10
💻 Step 3: Upload the Arduino Code
Open Arduino IDE
Paste this code:
Arduino code:
// Includes the Servo library
#include <Servo.h>
// Defines Tirg and Echo pins of the Ultrasonic Sensor
const int trigPin = 10;
const int echoPin = 11;
// Variables for the duration and the distance
long duration;
int distance;
Servo myServo; // Creates a servo object for controlling the servo motor
void setup() {
pinMode(trigPin, OUTPUT); // Sets the trigPin as an Output
pinMode(echoPin, INPUT); // Sets the echoPin as an Input
Serial.begin(9600);
myServo.attach(12); // Defines on which pin is the servo motor attached
}
void loop() {
// rotates the servo motor from 15 to 165 degrees
for(int i=15;i<=165;i++){
myServo.write(i);
delay(30);
distance = calculateDistance();// Calls a function for calculating the distance measured by the Ultrasonic sensor for each degree
Serial.print(i); // Sends the current degree into the Serial Port
Serial.print(","); // Sends addition character right next to the previous value needed later in the Processing IDE for indexing
Serial.print(distance); // Sends the distance value into the Serial Port
Serial.print("."); // Sends addition character right next to the previous value needed later in the Processing IDE for indexing
}
// Repeats the previous lines from 165 to 15 degrees
for(int i=165;i>15;i--){
myServo.write(i);
delay(30);
distance = calculateDistance();
Serial.print(i);
Serial.print(",");
Serial.print(distance);
Serial.print(".");
}
}
// Function for calculating the distance measured by the Ultrasonic sensor
int calculateDistance(){
digitalWrite(trigPin, LOW);
delayMicroseconds(2);
// Sets the trigPin on HIGH state for 10 micro seconds
digitalWrite(trigPin, HIGH);
delayMicroseconds(10);
digitalWrite(trigPin, LOW);
duration = pulseIn(echoPin, HIGH); // Reads the echoPin, returns the sound wave travel time in microseconds
distance= duration*0.034/2;
return distance;
}
Connect your Arduino
Select the correct COM Port and Board (Arduino Uno/Nano)
Click Upload ✅
Step 4: Install & Open Processing IDE
Download and install Processing IDE:🔗 https://processing.org/download
Open a new sketch in Processing IDE and paste the Processing code from above.
Processing code:
import processing.serial.*;
Serial myPort;
int lastUpdateTime = 0;
int updateInterval = 300;
int savedAngle = 0;
int savedDistance = 0;
String angle = "";
String distance = "";
String data = "";
String noObject;
float pixsDistance;
int iAngle, iDistance;
int index1 = 0;
int index2 = 0;
PImage flightIcon;
void setup() {
size(1200, 700);
smooth();
myPort = new Serial(this, "COM10", 9600);
myPort.bufferUntil('.');
flightIcon = loadImage("plane.png");
flightIcon.resize(60, 60);
}
void draw() {
fill(0, 20);
rect(0, 0, width, height);
fill(98, 245, 31);
noStroke();
drawRadar();
drawLine();
drawObject();
drawText();
}
void drawObject() {
if (millis() - lastUpdateTime > updateInterval && iDistance >= 5 && iDistance <= 40) {
savedAngle = iAngle;
savedDistance = iDistance;
lastUpdateTime = millis();
}
if (savedDistance >= 5 && savedDistance <= 40) {
pushMatrix();
translate(width / 2, height - height * 0.074);
pixsDistance = savedDistance * ((height - height * 0.1666) * 0.025);
float scaleFactor = 2.0;
float x = pixsDistance * cos(radians(savedAngle)) - (flightIcon.width * scaleFactor) / 2;
float y = -pixsDistance * sin(radians(savedAngle)) - (flightIcon.height * scaleFactor) / 2;
tint(255, 200);
image(flightIcon, x, y, flightIcon.width * scaleFactor, flightIcon.height * scaleFactor);
noTint();
popMatrix();
}
}
void serialEvent(Serial myPort) {
data = myPort.readStringUntil('.');
if (data != null && data.contains(",")) {
data = data.substring(0, data.length() - 1);
index1 = data.indexOf(",");
angle = data.substring(0, index1);
distance = data.substring(index1 + 1);
iAngle = int(angle);
iDistance = int(distance);
}
}
void drawRadar() {
pushMatrix();
translate(width / 2, height - height * 0.074);
noFill();
strokeWeight(2);
stroke(98, 245, 31);
arc(0, 0, width * 0.9375, width * 0.9375, PI, TWO_PI);
arc(0, 0, width * 0.73, width * 0.73, PI, TWO_PI);
arc(0, 0, width * 0.521, width * 0.521, PI, TWO_PI);
arc(0, 0, width * 0.313, width * 0.313, PI, TWO_PI);
line(-width / 2, 0, width / 2, 0);
for (int a = 30; a <= 150; a += 30) {
line(0, 0, (-width / 2) * cos(radians(a)), (-width / 2) * sin(radians(a)));
}
popMatrix();
}
void drawLine() {
pushMatrix();
strokeWeight(9);
stroke(30, 250, 60);
translate(width / 2, height - height * 0.074);
line(0, 0, (height - height * 0.12) * cos(radians(iAngle)), -(height - height * 0.12) * sin(radians(iAngle)));
popMatrix();
}
void drawText() {
pushMatrix();
if (iDistance < 5 || iDistance > 40) {
noObject = "Out of Range";
} else {
noObject = "In Range";
}
fill(0);
noStroke();
rect(0, height - height * 0.0648, width, height);
fill(98, 245, 31);
textSize(25);
text("10cm", width - width * 0.3854, height - height * 0.0833);
text("20cm", width - width * 0.281, height - height * 0.0833);
text("30cm", width - width * 0.177, height - height * 0.0833);
text("40cm", width - width * 0.0729, height - height * 0.0833);
textSize(45);
textAlign(CENTER);
text("OP SINDOOR - Radra System", width / 2, 50);
textSize(35);
textAlign(LEFT);
text("Angle: " + iAngle + " °", width - width * 0.48, height - height * 0.0277);
text("Distance: " + ((iDistance >= 5 && iDistance <= 40) ? iDistance + " cm" : "---"), width - width * 0.26, height - height * 0.0277);
// Red alert text when enemy spotted
if (iDistance >= 5 && iDistance <= 40) {
fill(255, 0, 0); // Red color
textSize(50);
textAlign(CENTER);
text("ENEMY SPOTTED!", width / 2, height / 2 - 100);
}
// Angle markers
textSize(25);
fill(98, 245, 60);
String[] angles = {"30°", "60°", "90°", "120°", "150°"};
int[] deg = {30, 60, 90, 120, 150};
for (int i = 0; i < angles.length; i++) {
float angleRad = radians(deg[i]);
float x = (width / 2) + (width / 2 - 100) * cos(angleRad);
float y = (height - height * 0.074) - (width / 2 - 100) * sin(angleRad);
text(angles[i], x, y);
}
popMatrix();
}
Download the radar interface plane image and place it in the same folder as your Processing .pde file.
📡 Step 5: Modify COM Port in Processing
Change port in the processing code here
myPort = new Serial(this, "COM10", 9600); // ← Change COM10 to match your Arduino COM
On Windows, check COM port from Arduino IDE → Tools → Port
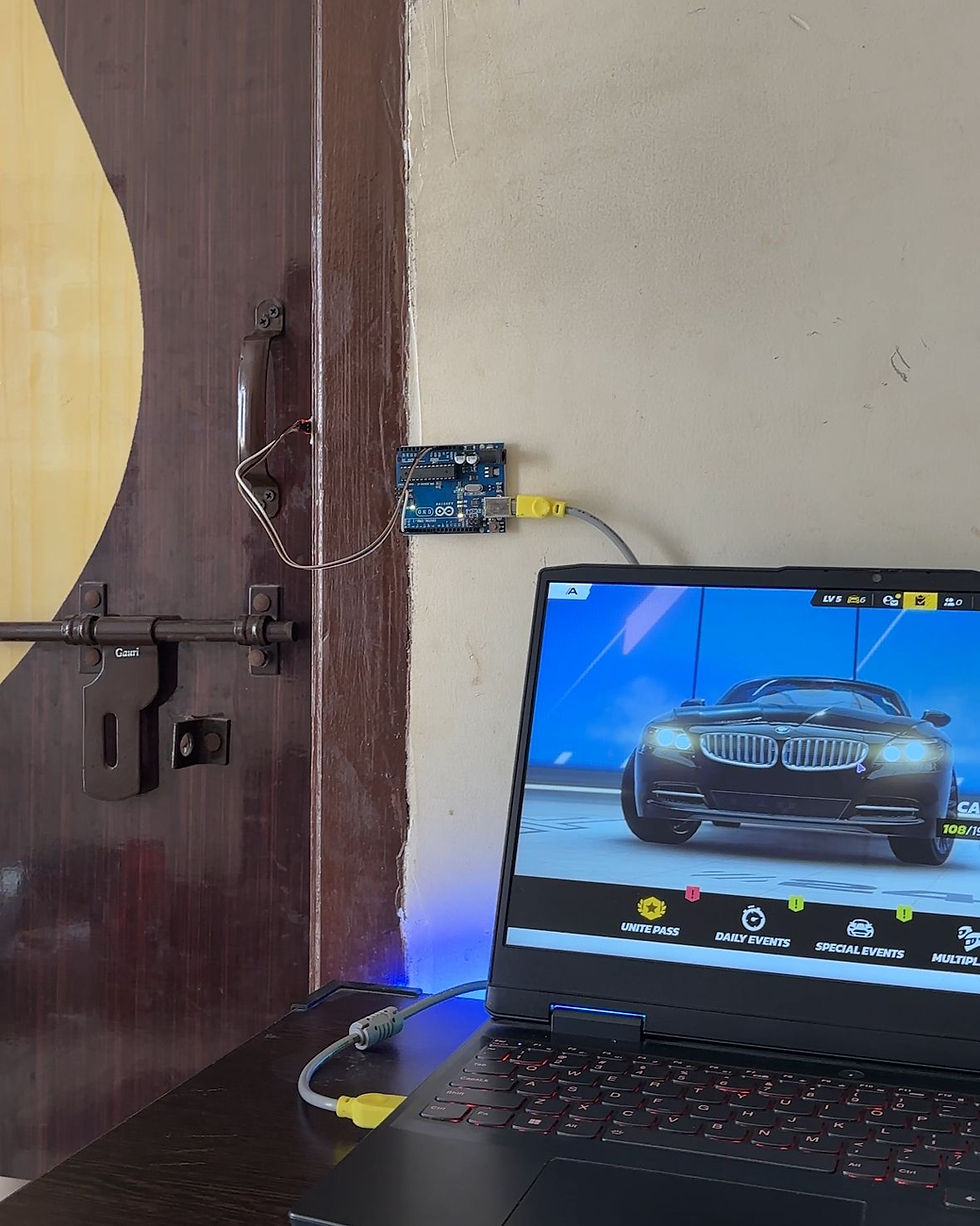
🎯 Step 6: Run the Radar System
Make sure the Arduino is already running and connected
In Processing, click Run ▶️
The radar animation will begin!You’ll see a sweeping green line and icons appearing if an object is detected nearby.
Troubleshooting Tips
Problem | Solution |
No data on radar? | Check COM port and baud rate in both Arduino & Processing |
Servo not moving? | Ensure it’s powered (VCC to 5V), and Signal is at D8 |
Object not detected? | Place hand or object within 30–40cm of ultrasonic sensor |
📞 Contact Us – Final Year Projects
Are you a student looking for your final year project or mini projects? We’re here to guide you through every step — from idea to implementation!
👨🔧 We Provide Support For:
Arduino-based Projects
IoT & ESP8266/ESP32 Projects
Embedded Systems Projects
Python-based Projects
Sensor Integration & Simulation
AI + IoT based Smart Systems
📲 Reach Out to Us:
📱 Phone/WhatsApp: +91 8143899920
📷 Instagram: @the_student_projects_
💡 Build real, innovative projects that go beyond the textbook — with expert support and student-friendly pricing.
Thank you Sir for providing to this project.